Supercharge Your Database App Workflow With The Gemini Cli Extension For Alloydb

AI generated cover image
The CLI Gets an AI Upgrade ????
The command line is the heart of a developer’s workflow, but juggling complex resource provisioning and SQL queries can be a tedious context switch. We’re excited to introduce the Gemini CLI Extension for AlloyDB, bringing the power of the Gemini AI agent directly into your terminal to manage your AlloyDB for PostgreSQL databases with natural language.
Why Use the Gemini CLI Extension for AlloyDB?
This extension moves beyond simple scripting by integrating AI with your database lifecycle management.
- Natural Language Management: Provision infrastructure (clusters, instances, users) and execute complex queries simply by describing what you want in plain English. No need to memorize all the gcloud flags or SQL syntax.
- Seamless Workflow: Stay in your terminal. You can manage the entire database lifecycle — from creation to schema exploration and data querying — without ever switching to the Google Cloud Console.
- Accelerated Development: Instantly generate database schemas, populate tables with sample data, and even get code generation for data access classes based on your tables.
This blog post walks you through a real-world scenario:
Setting up a complete AlloyDB cluster & instance
Creating an e-commerce schema
Analyzing data, and even
Kickstarting a full-stack reporting dashboard
— all via natural language prompts in the Gemini CLI.
— without leaving your IDE
— without opening your database
— just by chatting
Step 1: Installation and Setup ⚙️
Getting started is quick. After installing the latest Gemini CLI, you install the AlloyDB extension via its GitHub URL.
Install the main Gemini CLI:
npm install -g @google/gemini-cli@latest
Install the AlloyDB extension:
gemini extensions install https://github.com/gemini-cli-extensions/alloydb
Before launching the CLI, you set your environment variables to connect the extension to your Google Cloud project and database credentials (optional, but used here). Enter all that is applicable:
export ALLOYDB_POSTGRES_PROJECT=<<>>
export ALLOYDB_POSTGRES_REGION=us-central1
export ALLOYDB_POSTGRES_CLUSTER=<<>>
export ALLOYDB_POSTGRES_INSTANCE=<<>>
export ALLOYDB_POSTGRES_DATABASE=postgres
export ALLOYDB_POSTGRES_USER=postgres
export ALLOYDB_POSTGRES_PASSWORD=alloydb
Step 2: Infrastructure Provisioning in Minutes ????
The real power starts with provisioning. Instead of a long gcloud command, you use plain English to create your cluster.
Goal: Create a cluster named ecomm-test in a specified project and region.


Next, the agent identified the need for a Private Services Access setup, guiding the user through the IP allocation and VPC peering steps using automated gcloud commands (noting the ✓Shell prefix).

The extension sets out to do it:

Navigating Instance Creation Prerequisites
When trying to create a read-only instance, the agent correctly identified two key issues:
- Incorrect Instance Type: The first attempt failed because the command used READ for the instance type instead of the correct gcloud value: READ_POOL (for read-only instances).
- Missing Primary Instance: The second attempt failed because a READ_POOL instance cannot be created until a PRIMARY instance exists in the cluster.
3. The agent used its built-in knowledge to self-correct the command and then, understanding the underlying AlloyDB architecture (which requires a primary node), immediately offered to create the PRIMARY instance first.


Thus we have created the instance in the newly created cluster.

Step 3: Database and Data Interaction ✨
Once the infrastructure was ready, the focus shifted to database operations.
Goal: Create an e-commerce products table and populate it with test data.


This process was repeated to create and populate orders and order_items tables, then normalize the schema by replacing customer_name with a customer_id foreign key in the orders table and creating a new customers table—all with just two prompts!

Natural Language Data Analysis
Let’s query the newly created table first:
 Display content from products table in the database
With the data loaded, the final test was using natural language for analysis:
Business Analysis using Natural Language:
Find how many orders were placed in the last 30 days.


This shows the agent’s ability to interpret a business question, generate the required analytical SQL query (likely involving JOINs and GROUP BY), execute it, and provide a summarized result.
Now let’s create a new table for “customers” and load data:

Normalize the existing table data to match this newly added information:

Ask the agent for business intelligence reporting application ideas based on the data created:

Thus far we have been able to perform admin activities, do data search, natural language querying and get some business intelligence application development ideas from the extension.
Step 4: Full-Stack App Kickstart ????
The session concluded with an incredibly valuable developer task: planning a full-stack application and addressing prerequisites for Cloud Run deployment.
Goal: Create a Java Spring Boot full stack application with a Thymeleaf frontend for a data reporting dashboard, ready for Cloud Run deployment.
The agent immediately proposed a detailed four-step plan covering: Project Setup (with model, service, controller structure), Java Backend (connecting to AlloyDB), Thymeleaf Frontend, and Cloud Run Deployment preparation (Dockerfiles/config).
I let Gemini CLI takeover the application creation steps. It completed the whole process while asking me to enter a few confirmations which I did. The project is created in the following structure:

Now I compiled the app by running the command in the Cloud Shell Terminal from within the project’s base folder:
mvn package
I ran the app locally by running the following command from Cloud Shell Terminal from within the project’s base folder:
mvn spring-boot:run
There were some build errors. So I connected with Gemini CLI again and tried to resolve those:
Gemini CLI recommended that I run the AlloyDB auth proxy in another terminal before running the app locally:
./alloydb-auth-proxy projects/<<YOUR_PROJECT_ID>>/locations/us-central1/clusters/ecomm-test/instances/ecomm-test-primary
Now try to run the application again from another terminal:
mvn spring-boot:run
Test the application locally
I’m able to view the application result in the browser running on port 8080:
Products
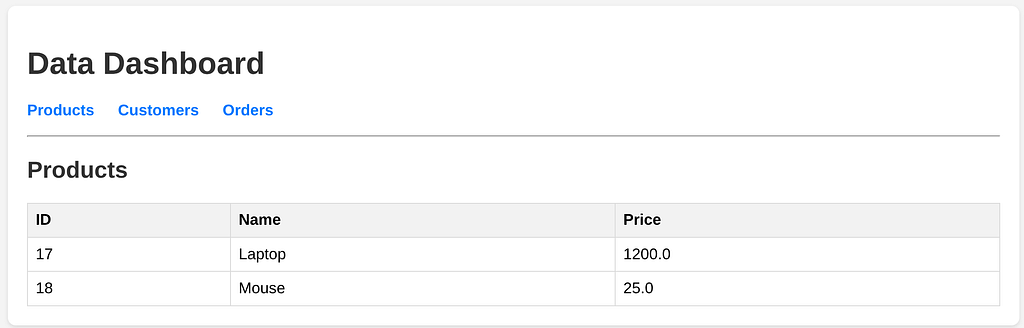
Customers

Orders


I asked the agent to help me deploy the AlloyDB Data Dashboard Spring boot app to Cloud Run:

It started creating the Dockerfile:

Followed by building it & deploying:

You can go through the steps, errors and corrections for deployment to Cloud Run. after multiple rounds of trial and error mine got deployed!!!

Try the app for fun. Add new database features, may be create a CRUD transaction app from the dashboard or something more meaningful for your use case.
Conclusion
The Gemini CLI Extension for AlloyDB is a game-changer for database developers and data professionals. It effectively minimizes context switching and automates complex tasks — from infrastructure provisioning and network setup, to schema normalization and analytical querying, and even full-stack application scaffolding.
By leveraging natural language, the Gemini CLI becomes more than a tool. It’s a true AI-powered partner right in your terminal, vastly accelerating your workflow. Give it a try today!
Supercharge your database app workflow with the Gemini CLI Extension for AlloyDB was originally published in Google Cloud - Community on Medium, where people are continuing the conversation by highlighting and responding to this story.
Popular Products
-
 Classic Oversized Teddy Bear
$25.78 -
 Gem's Ballet Natural Garnet Gemstone ...
$206.99$85.78 -

-
 Butt Lifting Body Shaper Shorts
$80.99$47.78 -
 Slimming Waist Trainer & Thigh Trimmer
$57.99$39.78